
Frequently Asked Questions
Bluetooth/USB Controller
Setup Instructions – Mac
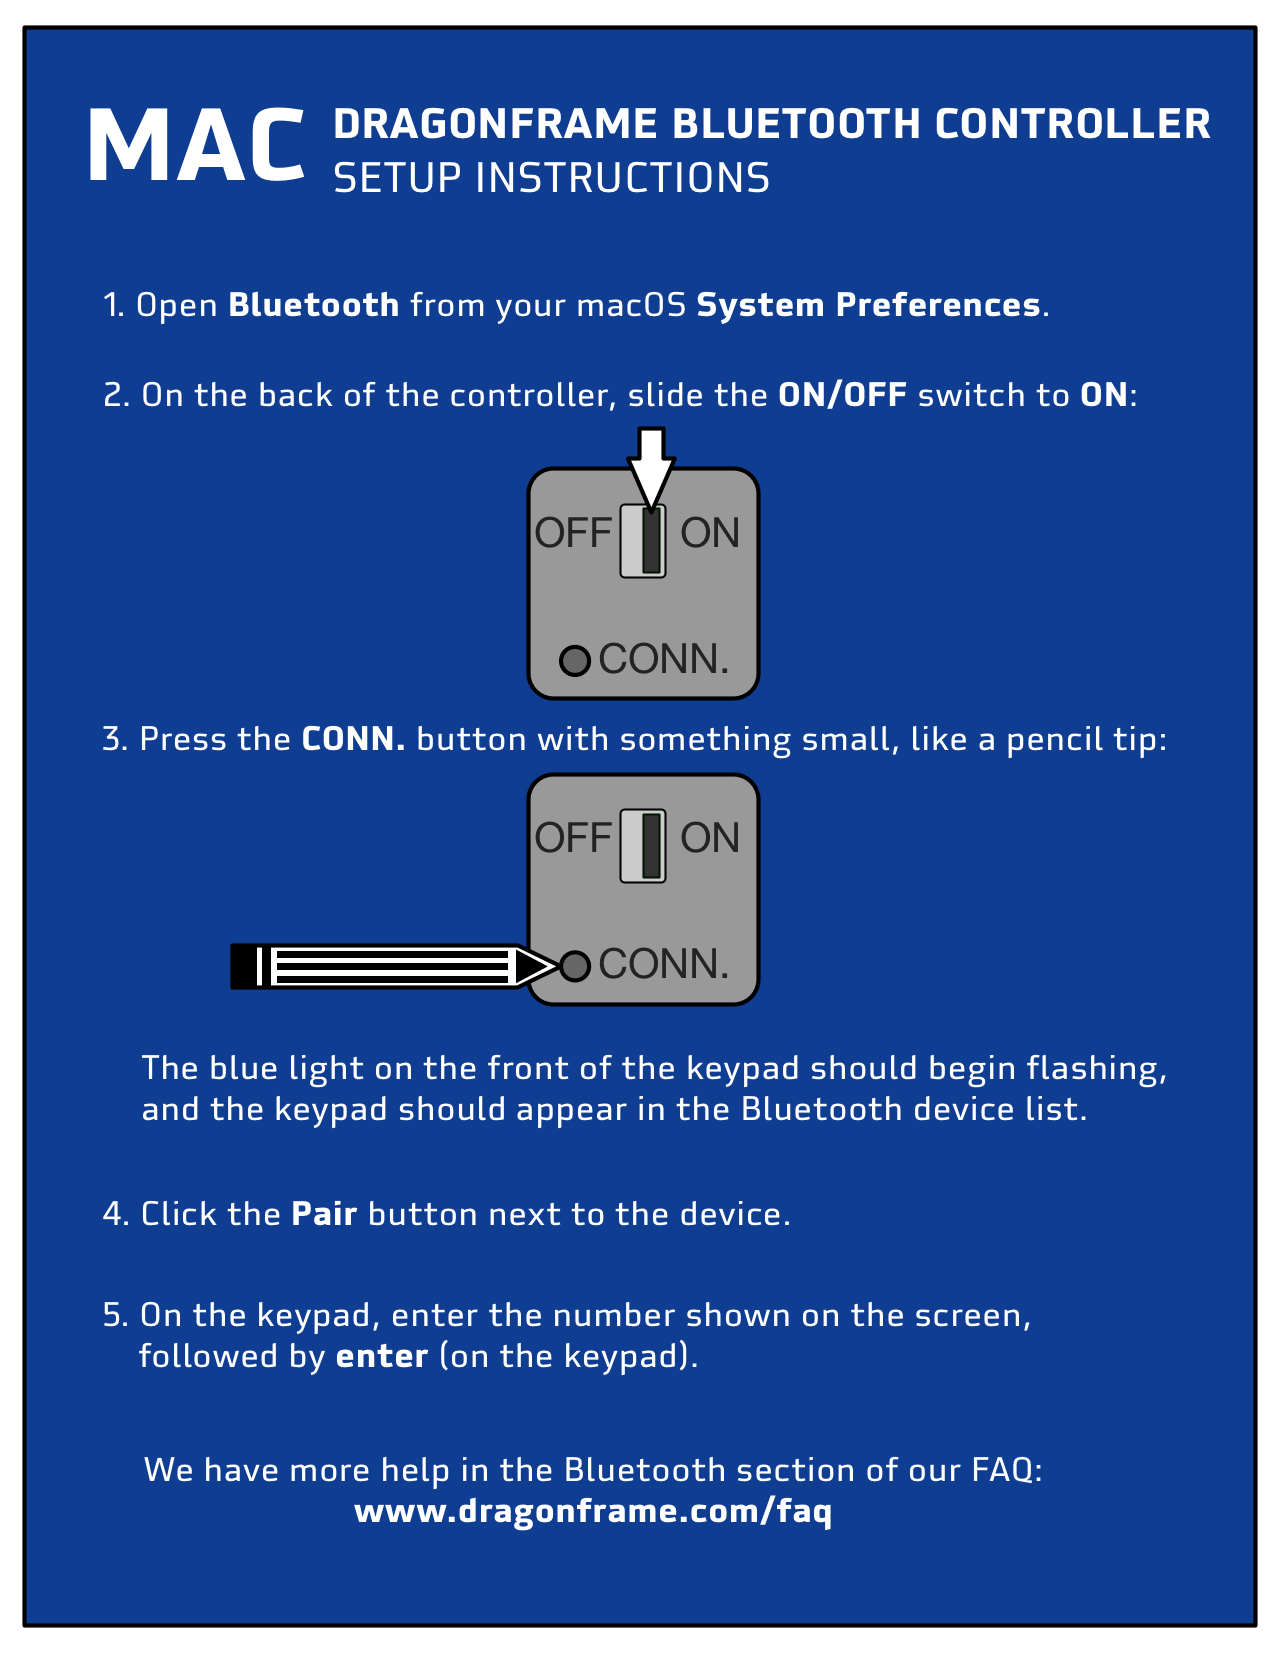
- Open System Preferences and go to Bluetooth.
- If it says “Bluetooth: Off”, press Turn Bluetooth On.
- Turn your Dragonframe Bluetooth Controller over:
- Flip the power switch to ON.
- Press the CONN. button. You will need to use a pencil tip, paper clip, or something similar to press it.
- (The blue light on the front of the keypad should be flashing.)
- The keypad should appear in the Bluetooth Devices list.
- Select the keypad in the Devices list and press the Pair button.
- Enter the number shown on screen using the bluetooth keypad and hit enter.
- Your keypad should be paired and ready to use.
Setup Instructions – Windows
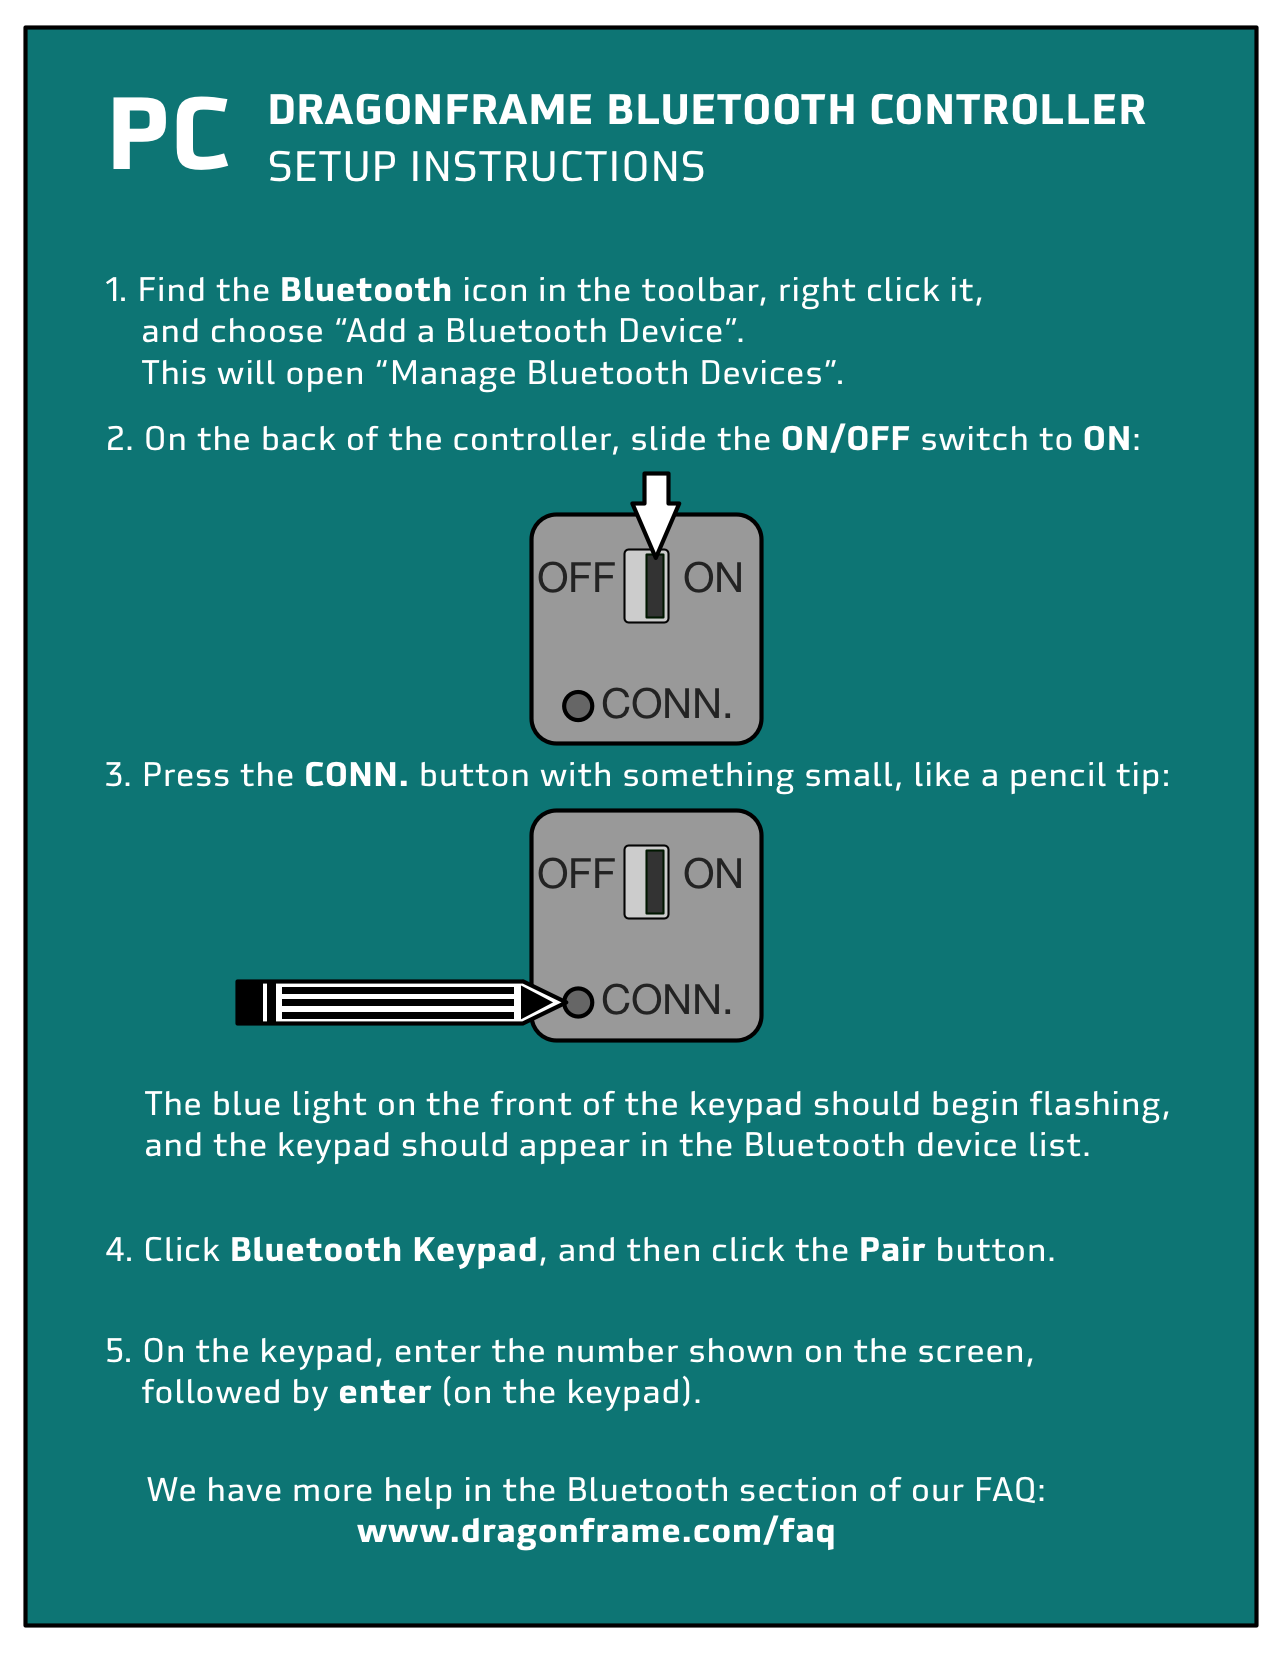
- Find the Bluetooth icon in the toolbar, right-click it, and choose Add a Bluetooth Device. This will open Manage Bluetooth Devices.
- Turn your Dragonframe Bluetooth Controller over:
- Flip the power switch to ON.
- Press the CONN. button. You will need to use a pencil tip, paper clip, or something similar to press it.
- (The blue light on the front of the keypad should be flashing.)
- The keypad should appear as “Bluetooth Keypad” in the Manage Bluetooth Devices list.
- Select the keypad and press the Pair button.
- Enter the number shown on screen using the bluetooth keypad and hit enter.
- Your keypad should be paired and ready to use.
Setup Instructions – Mac
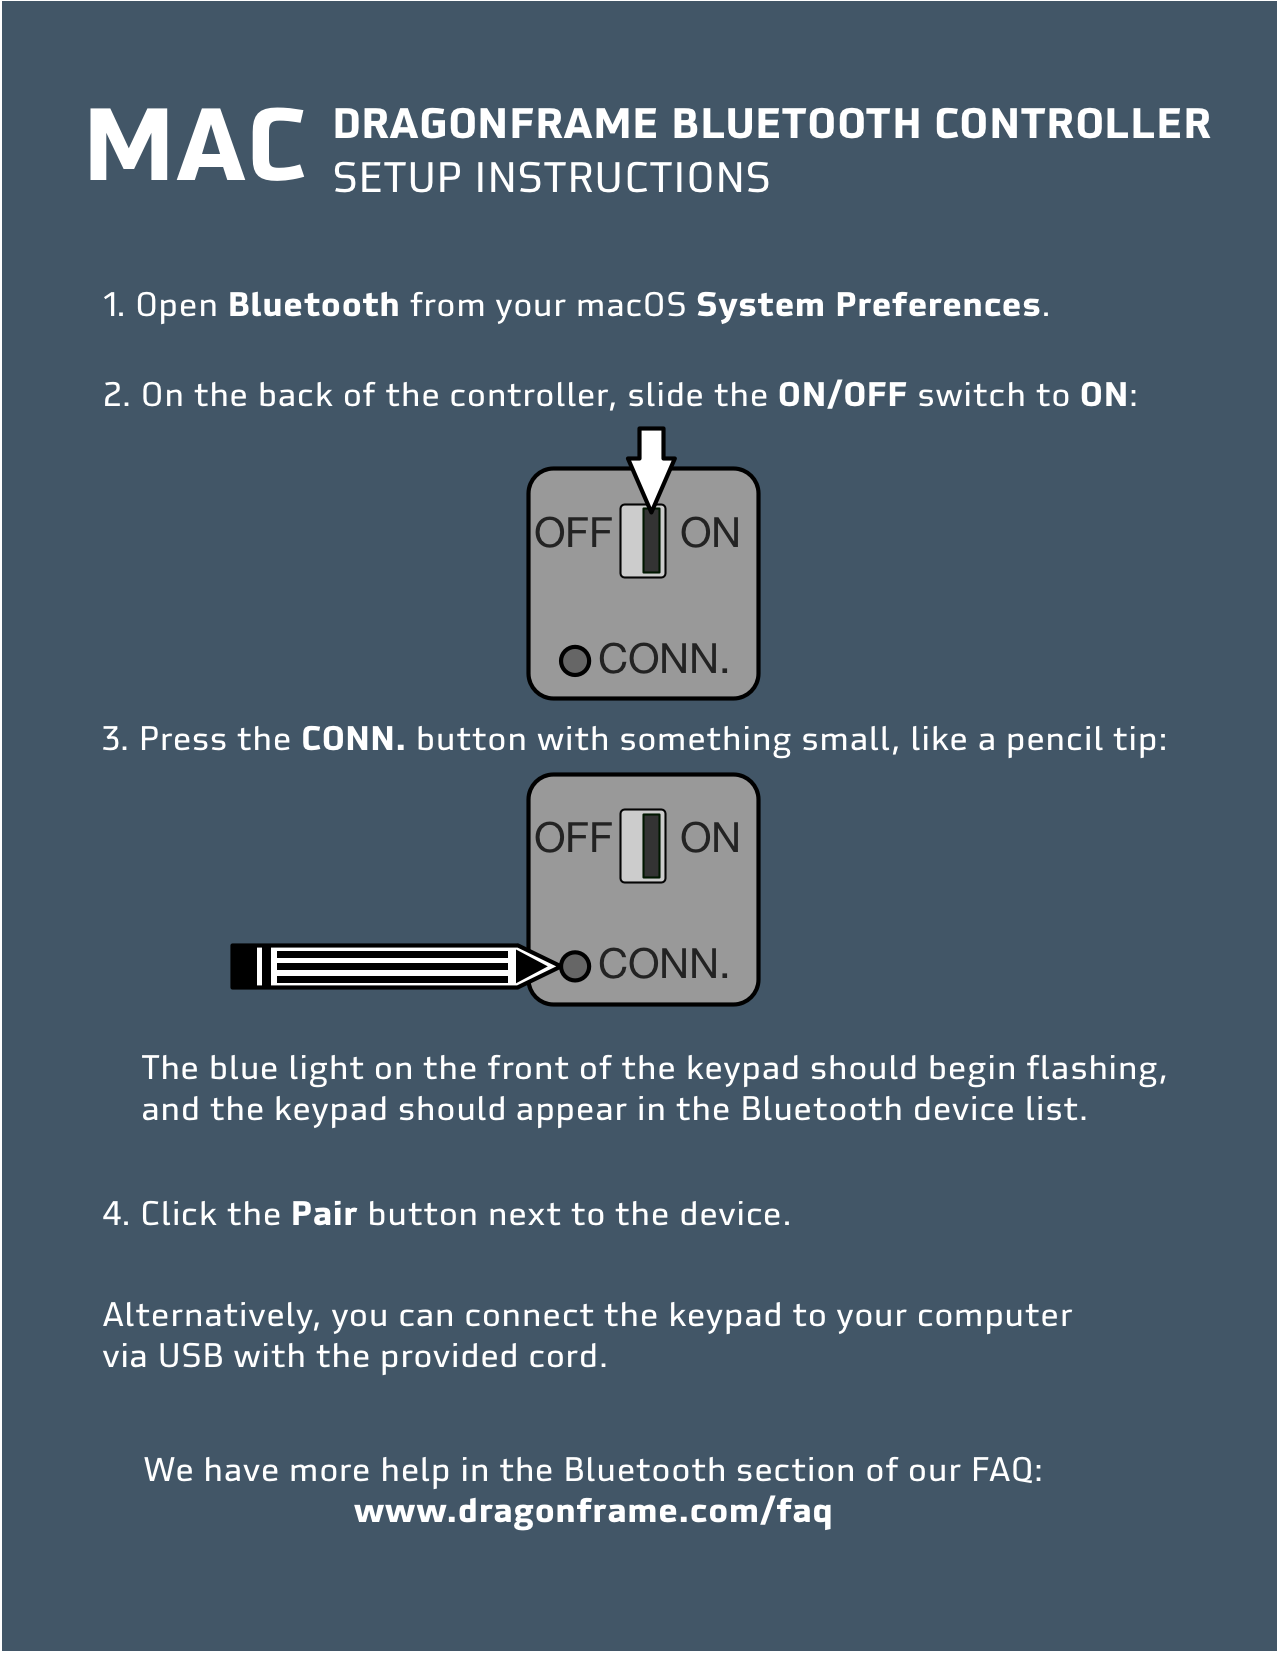
Bluetooth Instructions
- Do not plug in the USB cable if you are trying to connect to the controller via Bluetooth.
- Open System Preferences and go to Bluetooth.
- If it says “Bluetooth: Off”, press Turn Bluetooth On.
- Turn your Dragonframe Bluetooth Controller over:
- Flip the power switch to ON.
- Press the CONN. button. You will need to use a pencil tip, paper clip, or something similar to press it.
- (The blue light on the front of the keypad should be flashing.)
- The keypad should appear in the Bluetooth Devices list.
- Select the keypad in the Devices list and press the Pair button.
- Your keypad should be paired and ready to use.
USB Instructions
- Plug in the USB cable we provided to the controller, and the other end into the computer.
- (Batteries are not required for the USB mode.)
Setup Instructions – Windows
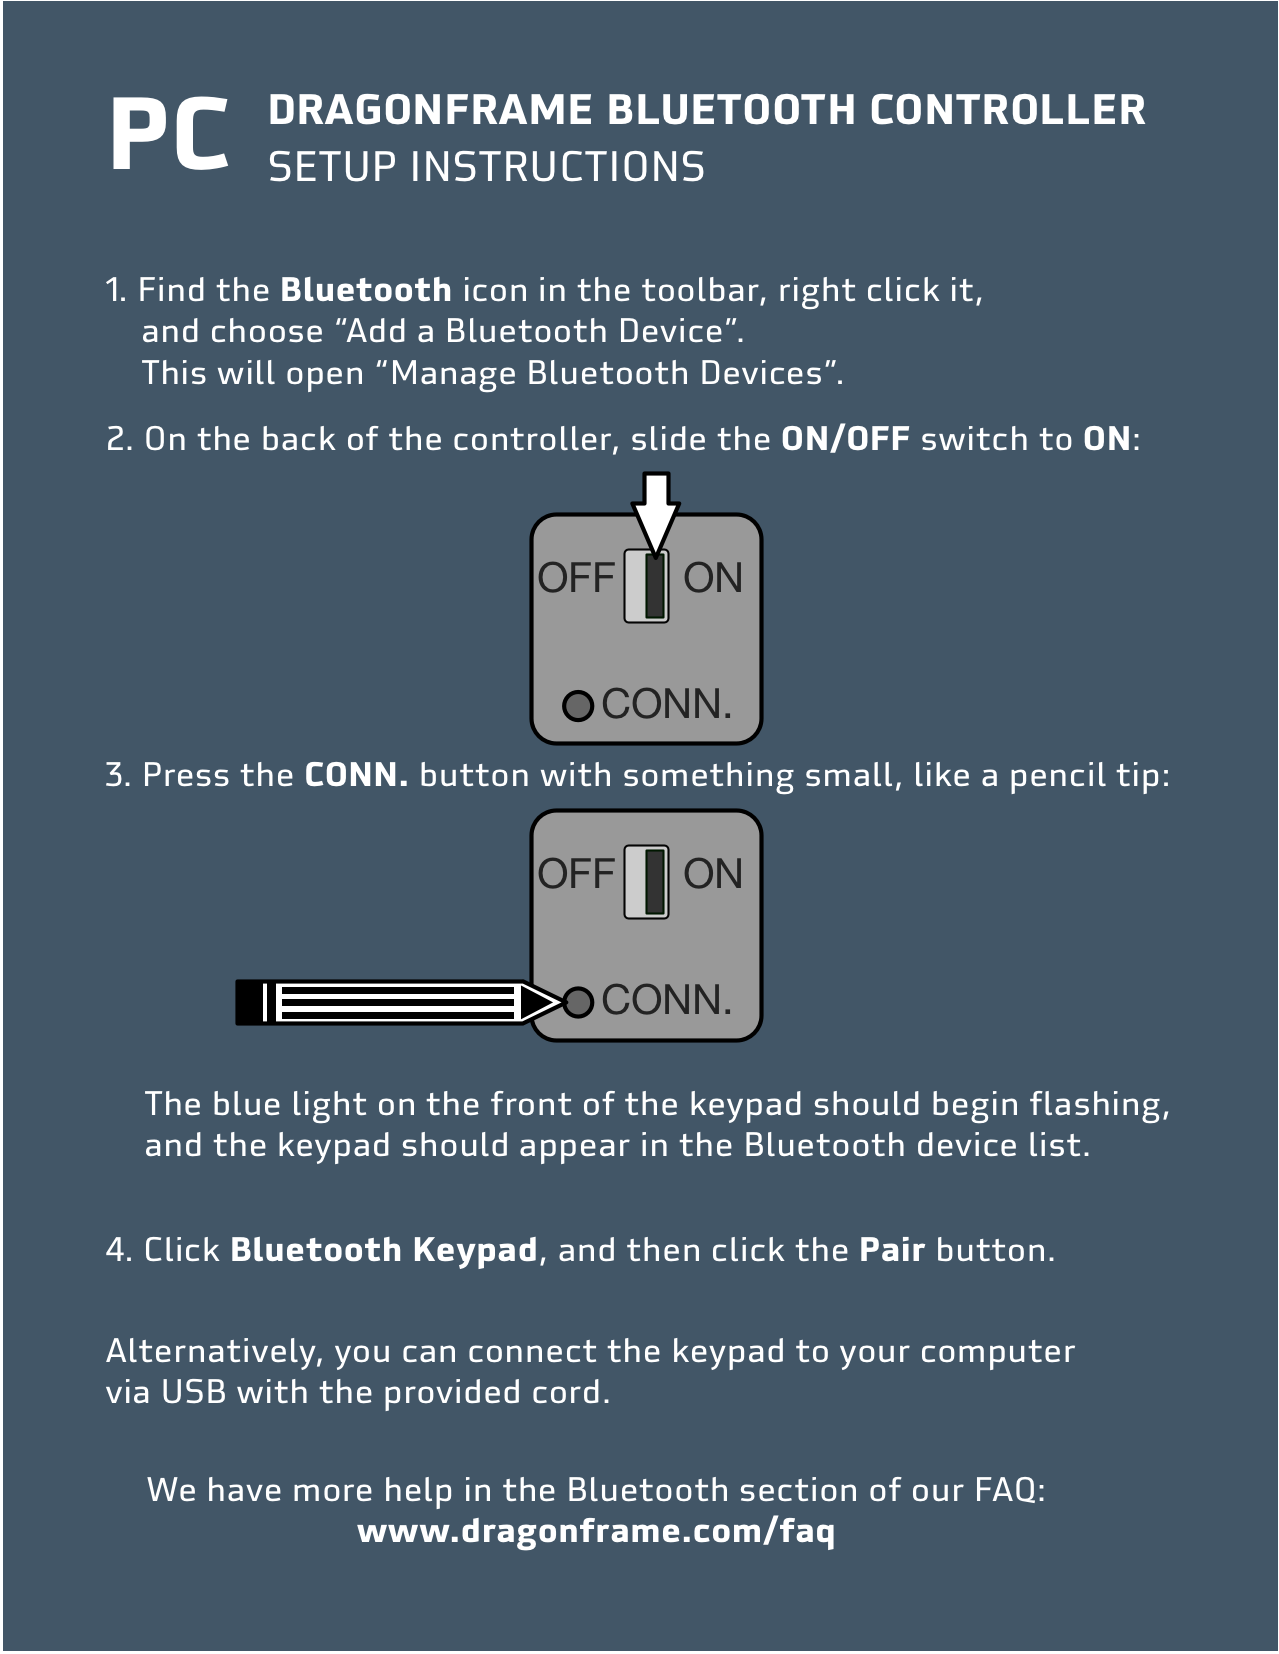
Bluetooth Instructions
- Do not plug in the USB cable if you are trying to connect to the controller via Bluetooth.
- Find the Bluetooth icon in the toolbar, right-click it, and choose Add a Bluetooth Device. This will open Manage Bluetooth Devices.
- Turn your Dragonframe Bluetooth Controller over:
- Flip the power switch to ON.
- Press the CONN. button. You will need to use a pencil tip, paper clip, or something similar to press it.
- (The blue light on the front of the keypad should be flashing.)
- The keypad should appear as “Bluetooth Keypad” in the Manage Bluetooth Devices list.
- Select the keypad and press the Pair button.
- Your keypad should be paired and ready to use.
USB Instructions
- Plug in the USB cable we provided to the controller, and the other end into the computer.
- (Batteries are not required for the USB mode.)
If the blue light doesn’t flash, it means you didn’t actually depress the CONN. button after turning the keypad on. You must use something small, like the tip of a pen or pencil, or a bent paper-clip, to press it.
Instead of giving you a code to type on the keypad, the computer asks you for the keypad’s PIN. If that happens, try this:
- When it asks you for a code, click into the field, and type “0000” on the regular computer keyboard, then click the Connect button.
- Immediately after that, type “0000”, followed by enter, on your Dragonframe Bluetooth keypad.
- Wait 15-30 seconds.
Note: The computer will not provide visual feedback of the keypresses.
Windows 10 added a feature to use a numeric keypad to control your mouse.
If this is on, the keypad won’t work properly.
To fix the issue:
- Open the ‘Ease of Access’ settings by pressing the Windows logo key + U on the keyboard.
- On the ‘Ease of Access’ settings screen, scroll down and select ‘Mouse’ in the left-hand column.
- On the right side of screen, click the On/Off toggle switch under ‘Control your mouse with a keypad’ to turn it off.
This issue applies to either the USB or Bluetooth keypad.
Installation / Activation
Dragonframe 5 supports both Intel and Apple Silicon natively. This means it runs natively on any of the Apple ‘M’ chips.
Dragonframe 4 is Intel only. However, it runs on the new Apple Silicon computers via Rosetta. It performs fairly well.
Dragonframe 4.3 and newer support macOS Catalina.
We have no plans to update Dragonframe 3 to support Catalina, due to continuous graphics driver changes from Apple.
General Requirements
To use Dragonframe, you will need a supported camera. [Supported Cameras]
Dragonframe 2025
System Requirements – Mac
macOS 11+ (Apple Silicon or Intel)
4GB+ RAM or more
System Requirements – Windows
Windows 10+ (64-Bit Only)
OpenGL 2.1 Capable Graphics Card
Intel/AMD CPU with 2+ Cores
4GB+ RAM
System Requirements – Linux
x86_64/amd64 Ubuntu 20+ or Fedora 34+
(Ubuntu recommended)
OpenGL 2.1 Capable Graphics Card
Intel/AMD CPU with 2+ Cores
4GB+ RAM
Dragonframe 2024
System Requirements – Mac
macOS 10.14+ (Apple Silicon or Intel)
4GB+ RAM or more
System Requirements – Windows
Windows 10+ (64-Bit Only)
OpenGL 2.1 Capable Graphics Card
Intel/AMD CPU with 2+ Cores
4GB+ RAM
System Requirements – Linux
x86_64/amd64 Ubuntu 20+ or Fedora 34+
(Ubuntu recommended)
OpenGL 2.1 Capable Graphics Card
Intel/AMD CPU with 2+ Cores
4GB+ RAM
Dragonframe 5.1-5.2
System Requirements – Mac
macOS 10.14-14.x (Apple Silicon or Intel)
4GB+ RAM or more
System Requirements – Windows
Windows 10+ (64-Bit Only)
OpenGL 2.1 Capable Graphics Card
Intel/AMD CPU with 2+ Cores
4GB+ RAM
System Requirements – Linux
x86_64/amd64 Ubuntu 20+ or Fedora 28+
(Ubuntu recommended)
OpenGL 2.1 Capable Graphics Card
Intel/AMD CPU with 2+ Cores
4GB+ RAM
Dragonframe 5.0
System Requirements – Mac
macOS 10.13-14.x (Apple Silicon or Intel)
4GB+ RAM or more
System Requirements – Windows
Windows 7/8.1/10/11 (64-Bit Only)
OpenGL 2.1 Capable Graphics Card
Intel/AMD CPU with 2+ Cores
4GB+ RAM
System Requirements – Linux
x86_64/amd64 Ubuntu 18+ or Fedora 22+
(Ubuntu recommended)
OpenGL 2.1 Capable Graphics Card
Intel/AMD CPU with 2+ Cores
4GB+ RAM
Dragonframe 4
System Requirements – Mac
macOS 10.10-12.x
OpenGL 2.1 Capable Graphics Card
1.33 GHz CPU or faster
2 GB RAM or more
System Requirements – Windows
Windows 7/8.1/10/11
OpenGL 2.1 Capable Graphics Card
1.33 GHz CPU or faster
2 GB RAM or more
System Requirements – Linux
x86_64/amd64 Ubuntu 16+ or Fedora 22+ (Ubuntu recommended)
OpenGL 2.1 Capable Graphics Card
1.33 GHz CPU or faster
2 GB RAM or more
Dragonframe 3.7
System Requirements – Mac
Mac OS X 10.6.8-10.14 (newer versions not supported)
OpenGL 2.1 Capable Graphics Card
1.33 GHz CPU or faster
2 GB RAM or more
System Requirements – Windows
Windows XP(32-bit)/Vista/7/8.1/10
OpenGL 2.1 Capable Graphics Card
1.33 GHz CPU or faster
2 GB RAM or more
Dragonframe 3.0
System Requirements – Mac
Mac OS X 10.5 – 10.9.5 (newer versions not supported)
QuickTime 7.2 or later
1.33 GHz CPU or faster
1 GB RAM or more
System Requirements – Windows
Windows XP(32-bit)/Vista/7 (newer versions not supported)
QuickTime 7.2 or later
1.33 GHz CPU or faster
1 GB RAM or more
Dragon Stop Motion 2
System Requirements – Mac
Mac OS X 10.4.11 – 10.9.5 (newer versions not supported)
QuickTime 7.2 or later
1.33 GHz CPU or faster
1 GB RAM or more
System Requirements – Windows
Windows XP(32-bit)/Vista/7 (newer versions not supported)
QuickTime 7.2 or later
1.33 GHz CPU or faster
1 GB RAM or more
Purchasing / Pricing
If you purchased Dragonframe 3 on/after January 1, 2016, you have been given an upgrade license.
Use the ‘Find Your License’ page to retrieve it.
Find Your License
If you purchased Dragonframe before then, you can purchase an upgrade to get the latest features.
Dragonframe Store
Yes. We offer the full version of Dragonframe to students at a discount in our store. You must provide a valid student ID or other documentation when you place your order.
The student version is strictly for non-commercial use, meaning you cannot be paid for work you do with it, and you cannot use it to promote a product or service that makes money.
Yes. Please visit our special pricing page for information on how to register for educational pricing.
To get a quote, fill out your cart as if you are shopping. On the checkout page, choose ‘Create a Quote’ as your ‘payment’ method. This will send you a valid quote instead of placing an order.
If you need special pricing, register for an account according to the instructions on that page, wait for the account to be approved, and then create the quote.
Yes. However, we want you to know a few things:
- The software is designed to be used with the keypad, and you will have the best experience with it.
- The software is always a digital download that you get immediately, even if you order the keypad.
You can purchase the software, with or without the keypad, in our store.
If you purchased it through us on Amazon, the serial number will be on a label on the CD jacket. It starts with “D5R01”. Type it in exactly as it is, in uppercase, and with the dashes. If it doesn’t work, send us your best guess and we can find it for you. If you purchased through a different vendor, you will have to contact them directly for the license. We won’t be able to find it for you.
Note: We cannot send you a serial number through email if you just purchased at Amazon. You must wait until the box arrives.
If you download the free trial, you can buy a full license at any time and fully activate the program. You do not need to download the software again.
When you buy the software from our site, we send you a serial number right away.
Your serial number is included in your invoice, in the Products Ordered table.
Note: If you buy it from another site, such as Amazon.com, you will have to wait for the box to arrive.
You convert the free trial to a full version like this:
- Start the program and select Help : Activate License… from the menu.
- Enter your purchased serial number and click Activate to activate the software.
Tips:
- Copy and paste the serial number from the e-mail we sent you. Don’t enter it manually.
- The “Registered To” field can be anything, but it must be at least three characters long.
As soon as your payment clears, we send you an invoice with your serial number in it.
Note: Student orders must also wait to be approved, which can take 1-2 business days.
If you have already been using the trial, you can instantly activate the full version. (You do not need to download the program again.)
If you haven’t downloaded the trial, you will have to download and install the software.
The USB and Bluetooth keypads have a one-year warranty:
DZED One Year Warranty
The DMC+, DMC-32, DMC-16, DDMX-512, DDMX-S2 and LV Cap have a two-year warranty:
DZED Two Year Warranty