Contour Shuttle

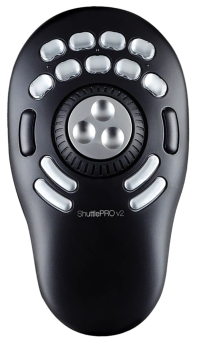
The Contour Shuttle PRO v2 is a controller with 15 buttons, a spring-loaded ring that returns to center, and a dial the spins infinitely.
Dragonframe also supports the ShuttleXpress, a smaller controller.
Starting with Dragonframe 5 we have integrated the Shuttle PROv2 and ShuttleXpress into the software.
Basic Setup
You do not need to install Contour’s drivers or software to use the controller with Dragonframe.
- Start Dragonframe 5.1.
- Plug in the controller.
- A small orange icon should appear in the top-right corner of the main Dragonframe program window.
- Click on the icon to open the configuration screen.
Configuration Screen
At the top of the configuration screen are the workspace icons. Each workspace has its own Contour Shuttle configuration.
Click on a workspace to configure the actions for it.
Choose New Configuration from the menu on the left to create a new configuration.
Each button has a corresponding action selection box on the right-hand side.
Many of the actions are self-explanatory, and correspond to what we call things on the numeric keypad setup.
Dial
In general, if you have any configuration set up for a workspace, then the inner dial will move the current view frame number for that workspace.
Moving an Axis
Select the Arc Motion Control workspace tab in the shuttle configuration screen.
Assign an axis to a button.
To jog an axis, hold the axis button, then turn the spring-loaded ring. The axis will stop if you release the ring or the button.
To jog at a reduced rate, press the axis button an extra time (or two) before holding it down.
Action: KEY
The KEY action can be assigned to the Arc Motion Control workspace.
To set a keyframe for a single axis, hold the button for the axis, then press the KEY button.
To set a keyframe for all axes, double click the KEY button.
Action: JOG ALL
If you have a real-time motion control device (DMC-32, DMC-16, etc), you can browse the whole move you have programmed. We call this “Jog All” in the actions and in our user guide.
Assign JOG ALL to a button.
Later, after you’ve programmed a move, move all axes to their programmed position for the current frame.
Once you’ve done that, you can hold the JOG ALL button and use the spring-loaded ring to jog forward or backward through the move. Just like with an axis, if you press the JOG ALL button an extra time (or two) before holding it down, it will jog through the move at a reduced speed.
If you hold JOG ALL and then spin the dial, the frame number will change, and the system will jog towards that frame. This way you can step through the move frame by frame.
Action: VIEW
The VIEW action can be assigned to the Arc Motion Control or Cinematography workspaces.
In the Arc Motion Control workspace, this action toggles between two large views for working with the shuttle at a distance.
In the Cinematography workspace, this action toggles through the view modes (hide controls and thumbnails).
Safe Move Window
The safe move window provides a way for non-moco operators (such as the art department) to have a safe way to browse the move at a reduced speed.
The safe move window (which you can open via the Window menu, “Show Safe Move Window”) has a basic, pre-defined configuration for the shuttle.
The JOG ALL action is assigned to the black button on the left (“J”). It works the same was as it does in the Arc Motion Control workspace, but it is limited to a top speed set within the Arc real-time settings.
The TEST SHOT action is assigned to the black button on the right (“K”). It takes a test shot.
